Lakerunner

Lakerunner (opens in a new tab) transforms an S3-compatible bucket into a production-grade Observability stack in minutes.
What is Lakerunner?
Lakerunner is an open-source observability data lake that stores logs, metrics, and traces in cloud object storage (S3, GCS, Azure Blob). It provides:
- Cost-effective storage - Store petabytes of observability data at object storage prices
- Fast queries - Columnar format with intelligent indexing for sub-second queries
- Native Grafana integration - Query your data lake directly from Grafana
- Kubernetes-native - Deploy with Helm, scale with KEDA
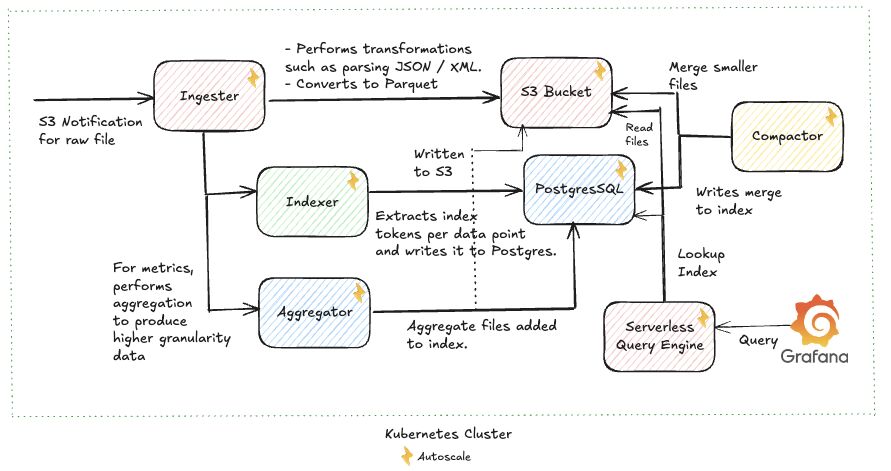
Architecture

Deployment Options
Lakerunner supports two deployment modes:
| Mode | Use Case | Infrastructure |
|---|---|---|
| Kubernetes POC | Proof of concept with real cloud resources | Any Kubernetes cluster |
| Production | Full HA deployment | Production Kubernetes with autoscaling |
Getting Started
Ready to deploy? Head to the Installation Guide to get started with our interactive setup wizard.
Prerequisites
Before installing Lakerunner, ensure you have:
- kubectl (opens in a new tab) - Kubernetes CLI
- Helm (opens in a new tab) 3.14+ - Package manager for Kubernetes
- Kubernetes cluster 1.28+ (local or cloud)
For POC and Production deployments, you'll also need:
- S3-compatible object storage with notification capability (S3, GCS, or Azure Blob)
- PostgreSQL 16+ database
- Kafka cluster (minimum 2 brokers for production)
- KEDA (opens in a new tab) - Highly recommended for production autoscaling
Reach out to support@cardinalhq.io for support or to ask questions not answered in our documentation.